Patches are an instant personality for our clothes and gear. But if an embroidered patch starts peeling, it goes from “cool” to “why is my jacket shedding?” real quick. Let’s avoid that.
This DIY guide shows how to stick embroidered patches the clean way, on jackets, hats, backpacks, uniforms, and everyday clothing, without turning it into a science project.
How to Stick Embroidered Patches
Check the Backing First
Flip the patch over and look at the back. A shiny plastic-like layer usually means an iron-on embroidered patch. A paper layer you peel off means peel-and-stick. Plain thread/fabric backing means sew-on (or glue + stitches).
If we don’t match the method to the backing, even the best-looking embroidery patch can fail. Quick check now saves a lot of “why won’t this stick?” later.
Prep the Fabric So It Actually Holds
Pick a flat spot. Firm fabrics like denim, canvas, and cotton twill are the easiest to work with. Stretchy fabric is tougher because it keeps pulling and flexing, which can lift edges.
Wipe off dust, lint, or oils, then smooth the area. If it’s wrinkled, give it a quick iron pass first. Clean + dry + flat is what makes embroidered patches stick like they mean it.
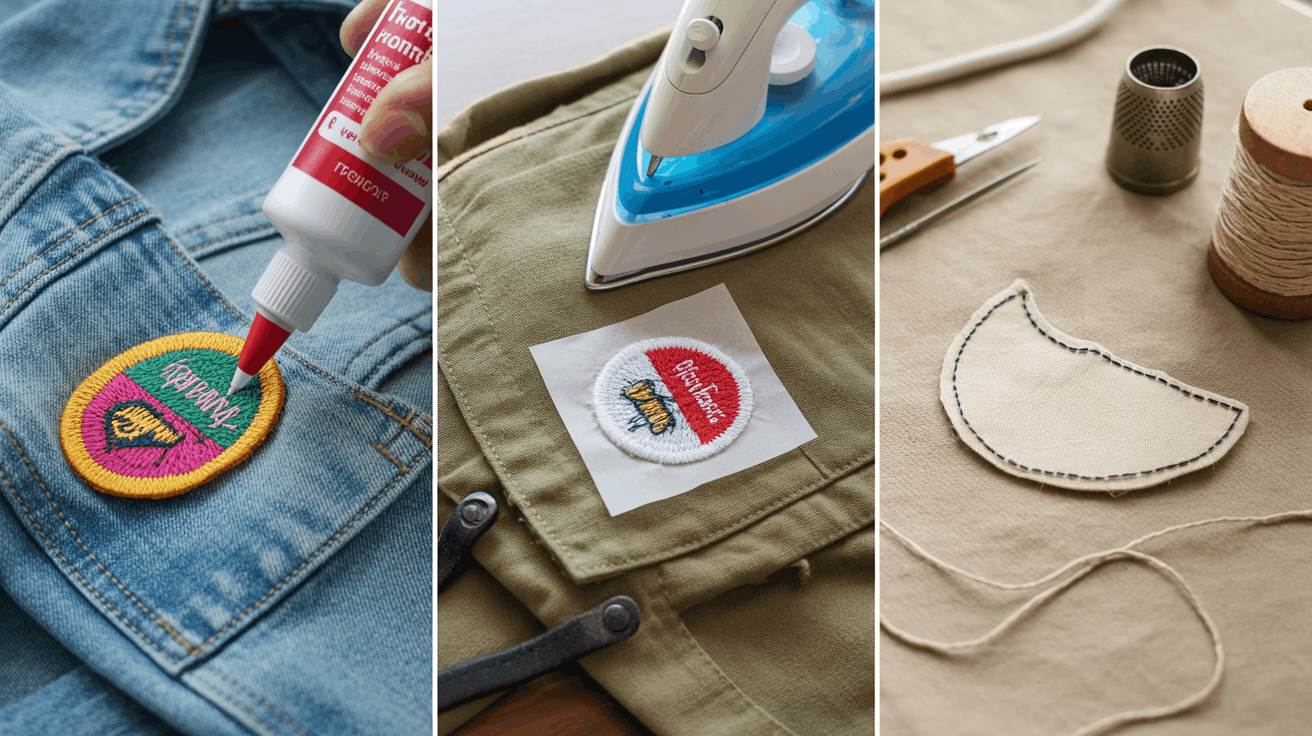
Iron-on Embroidered Patches
Place the patch exactly where we want it. Cover it with a thin cotton cloth (or parchment paper) to protect the embroidery threads. Set the iron to the highest heat the fabric can handle and turn steam OFF.
Press straight down with firm pressure for about 20–30 seconds. Don’t slide the iron, sliding can shift the patch and drag the glue around. Lift, move, press again until the whole patch gets heat.
For thicker items (like jackets), flip it inside out and press the back side of the patch area for another 10–15 seconds. Then let it cool completely before touching the edges. Cooling is when the adhesive sets, so no early “let me test it” tugging.
If an edge still looks loose after it cools, cover it and re-press that edge for another 10–15 seconds. Simple fix.
Peel-and-stick Embroidered Patches
Peel off the backing paper, line it up carefully, and press hard from the center out. Put extra pressure on the border. Hold pressure for 30–60 seconds so the adhesive bites.
Peel-and-stick is great for short-term wear, events, and light-use clothing. For heavy-use stuff (backpacks, work shirts, uniforms), it’s better as a temporary hold unless we add a few stitches.
Fabric Glue
If the fabric is heat-sensitive or the item is awkward to iron, fabric glue can help. Use glue made for clothing. Spread a thin, even layer on the back of the custom patch (thin matters, glue blobs can seep through embroidery and look messy). Press the patch down and hold it in place for a minute.
Let it cure fully (often a few hours or overnight). If we can, place a clean cloth over it and set a book on top while it dries. A little steady pressure makes the bond stronger.
Sew-on Patches
The most durable embroidered patches on clothing are stitched. Even if we use iron-on or glue, adding a few quick hand stitches, especially at the corners, stops edge lift over time.
After applying any adhesive method, wait about 24 hours before washing. Wash inside out when possible and go easy on high-heat drying. Too much dryer heat can slowly weaken adhesive. If the item gets used hard (workwear, backpacks, team gear), sewing the border is the safest long-term move.
FAQs
Can we iron an embroidered patch onto polyester?
Sometimes, yes. Use a lower heat setting, press longer, and always use a cloth barrier. If the fabric feels risky, go glue + a few stitches instead.
Why is my iron-on patch peeling at the corners?
Usually it’s not enough pressure, not enough heat, or we slid the iron around. Re-press the loose edge with firm pressure, no steam, and let it cool fully.
What’s the best way to stick embroidered patches on backpacks?
If the material tolerates heat, iron-on works. For rugged daily-use bags, stitch the border (or at least tack the corners). Backpacks get dragged, bumped, and flexed, adhesive alone can struggle.
Do peel-and-stick patches survive washing?
They can handle light wear, but frequent washing is rough on them. For wash-proof results, use iron-on with reinforcement or a sew-on patch.
Stick Embroidered Patches Hassle-free!
With this simple-to-grasp guide, one knows how to stick embroidered patches without the peel-and-pray routine, check the backing, prep the fabric, use the right method, and reinforce when the item gets real use.
If you want patches that arrive ready for your exact application, iron-on, peel-and-stick, or sew-on, The Eagle Patches USA can make custom embroidered patches that look sharp and stay put on your gear.