A hat patch is a power move. It’s also a high-traffic area. Your hat gets bent, tossed, sweated on, and stuffed into bags like it owes money. That’s why sewing beats relying on glue alone. If you want a patch to stay on your cap for the long haul, this is the clean way to do it.
How to Sew a Patch On a Hat
Step Zero Is Placement, and It Matters More Than You Think
Before you grab a needle, put the hat on your head and check the mirror. The “center” of a hat can look off depending on the crown shape and how you wear it. Mark the spot lightly with a tiny piece of tape or a washable marker.
If you’re sewing onto a curved front panel, keep the patch slightly higher than you think. A patch placed too low can look like it’s sinking when the brim curves forward.
Pick the Right Patch Style for Caps
Most caps look great with embroidered patches because they have that classic texture and clean border. If your design has tiny letters, woven patches usually read sharper. PVC patches are tough and handle outdoor wear well, but they can feel thicker to stitch through. Leather patches look premium and simple.
Chenille is bold and varsity-style, but it’s bulky. Applique and sequin patches lean more fashion-forward. Sublimated patches are great for full-color artwork. Whatever you choose, hats do best with a patch that has a clean edge. It makes stitching easier and looks finished.
Set the Hat up So You Are Not Wrestling It
Stuff the hat with a folded towel or a t-shirt so the front panel feels firm. This gives your needle something solid to push against and keeps the fabric from collapsing while you stitch.
Now position the patch and hold it in place with fabric clips if you have them. Pins work too, but clips are easier on structured caps. If the hat has a lining band inside, try to keep it out of the way so you don’t stitch it shut.
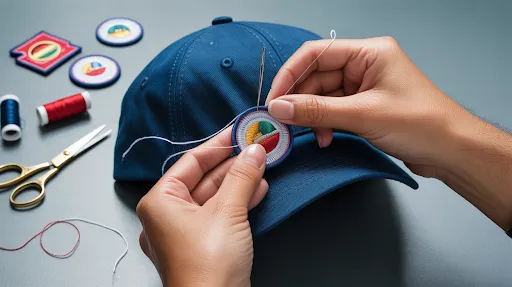
Stitch Choice That Looks Good and Stays Strong
For hats, you want stitches that hold the edge down without looking messy. A simple whip stitch around the border works great and is easy for beginners. If you want a nicer look, a blanket stitch gives a clean finished edge.
Use a strong thread. Regular sewing thread works, but a thicker thread holds up better on hats that get worn daily. Match the thread to the custom patch border if you want it subtle, or use a contrast thread if you want it to look intentional and bold.
Sew Around the Patch Without Making the Hat Pucker
Thread your needle and knot the end. Start from the inside of the hat so the knot is hidden. Bring the needle up near the patch edge and begin stitching around the border. Keep your stitches evenly spaced. Pull snug, but not so tight that the hat fabric puckers. If you see wrinkling, loosen your tension slightly.
When you reach tricky spots like thick embroidery borders or leather edges, take smaller stitches and push slowly. A thimble helps a lot here. Hats are tough. Your fingers do not need to be.
Once you complete the full circle, go around a second time if the hat is a workhorse cap you wear daily. Two rounds of stitching can make the patch feel locked in. Finish on the inside with a tight knot. Run the needle through a couple stitches before tying off to keep it secure, then trim the thread.
If you want extra stitch ideas that also apply to hats, the jacket guide “How to Sew a Patch on a Jacket and Make It Look Awesome” is a solid reference for clean borders and neat finishing.
Fixes if Your Patch Is Shifting or the Hat Is Tricky
If the patch keeps sliding while you sew, use a tiny dot of fabric glue behind the patch just to hold it in place. Let it get tacky before stitching. Don’t rely on glue as the main hold. Think of it like a helper, not the hero.
If the hat is very structured, you may find it easier to sew with the brim facing away from you and rotate the hat as you go instead of twisting your wrist.
FAQs
Can you sew a patch on a hat without removing the lining?
Yes, but be careful. Check inside as you stitch so you don’t sew the sweatband or inner layers shut.
What needle works best for sewing patches on hats?
A stronger needle helps, especially for thick embroidered patches, PVC, or leather. If your needle bends, swap to a heavier one.
Will sewing ruin the hat shape?
Not if you stuff the hat while sewing and keep tension even. Avoid pulling so tight that the fabric puckers.
Can you sew iron-on patches onto hats?
Yes. Even if a patch has iron-on backing, sewing it on is the best way to keep it secure on a hat.
The Payoff!
Now you know how to sew a patch on a hat without crooked placement, loose edges, or a hat that looks like it lost a fight with a stapler. If you want patches made specifically for caps with clean borders and sharp detail, The Eagle Patches USA can help you get the right patch type so it looks great and holds up to real wear.