A plain shirt is fine. A shirt with a patch looks like it has a story. The only thing standing between “clean upgrade” and “why is my patch peeling” is how you press it. Let’s do it right the first time.
How to Iron a Patch on a Shirt
Check the Shirt Fabric So You Don’t Ruin It
Start with the tag. Cotton shirts are the easiest. Cotton blends usually work great too. Polyester can work, but it needs lower heat and a little more patience. If the shirt is very stretchy, silky, or says dry clean only, don’t iron a patch on it. That’s a fast track to scorch marks and regret.
Now check the patch. Iron-on patches usually have a shiny, smooth backing that melts with heat. If the back looks like plain thread, it’s likely sew-on. Ironing a sew-on patch won’t make it stick, it’ll just get warm and sit there.
Place it Carefully Because You Only Want to Do this Once
Lay the shirt on a hard flat surface, not a couch cushion. Smooth it out and pre-iron the spot for a few seconds to remove wrinkles and moisture.
Then position the custom patch. Stand up and look at it from a normal distance. On a shirt, “centered” can look too high or too low depending on the shirt fit. Take ten seconds here, save ten minutes later.
Set the Iron on its Highest Setting
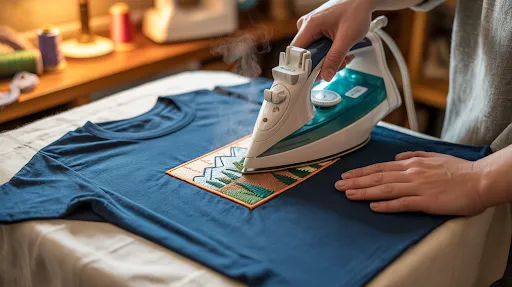
Turn steam off. Steam feels helpful, but it messes with the adhesive. Set the iron to the hottest setting your fabric can handle. For cotton, high heat is fine. For polyester, stay lower and press longer.
Put a thin cotton cloth or parchment paper on top of the patch. This protects the embroidery thread and helps distribute heat evenly.
Press the Patch, Don’t Skate it Around
Here’s the big rule for how to iron a patch on a shirt. You press straight down. You don’t slide the iron like you’re ironing a dress shirt. Sliding can shift the patch and move the adhesive.
Press firmly for 20 to 30 seconds. If the patch is larger, press in sections until the whole patch has had solid heat time. Pay extra attention to the edges because corners love to lift first.
Lift the iron, move to the next section, press again. Keep pressure steady.
Press from the Inside for a Stronger Hold
If the shirt allows it, flip it inside out and press the back side of the patch area for another 10 to 20 seconds. This helps the glue bond into the fabric instead of just sitting on the surface.
Then let everything cool completely. Cooling is when the adhesive sets. Don’t tug at the patch right away. Let it chill. If an edge lifts after it cools, cover that edge and press again for another 10 to 15 seconds.
If you want the full ironing approach for different patch styles and longer wear, this guide “How to Iron on Patches for Vibrant and Long-Lasting Style” is a good add-on.
FAQs
Can I iron a patch on a polyester shirt?
Yes, sometimes. Use lower heat, press longer, and test a hidden area first so you don’t leave shine marks.
Why is my iron-on patch peeling at the corners?
Usually not enough heat, not enough pressure, or the iron was moved around. Re-press the edges with firm pressure and let it cool fully.
How long should I press an iron-on patch on a shirt?
Most patches need 20 to 30 seconds per section, plus a quick press from the inside for a stronger bond.
Will an iron-on patch survive the wash?
It can, especially on cotton and cotton blends. For frequent washing, add a few stitches for extra security.
Let’s Iron a Patch on Your Shirt!
As this guide teaches us the steps, you can now iron a patch on a shirt without the peeling corners or crooked placement. Clean surface, no steam, firm press, press the edges, cool fully. If you want iron-on patches that are made to apply cleanly on shirts, with crisp embroidery and the right backing, The Eagle Patches USA can help you get a sharp result without the trial and error.