
Dyeing custom leather patches is one of those DIY projects that actually feels rewarding. You take something plain or worn, add a splash of color, and suddenly it looks brand new. It’s the kind of craft that lets you show off your personality on jackets, bags, hats, or just about anything that can handle a little leather flair.
Follow this guide, and you’ll be able to turn any patch into a custom masterpiece that lasts.
Step-by-Step Process to Dye Leather Patches at Home
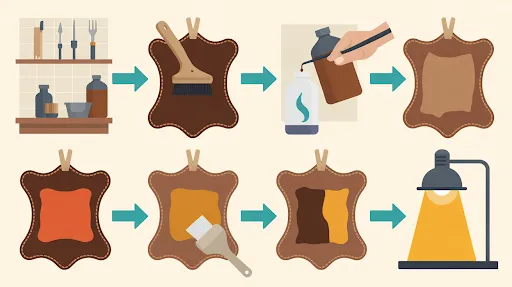
Follow these simple steps to transform your leather patches with vibrant, long-lasting color.
- Prepare Your Workspace: Cover your work surface with newspapers or a plastic sheet. Leather dye stains easily. Wear gloves and keep cloths or paper towels nearby for cleanup.
- Prepare the Leather: Clean patches with a leather preparer or deglazer to remove oils, dirt, and coatings. Gently sand rough areas with fine-grit sandpaper. Wipe clean to ensure the dye absorbs evenly.
- Apply the Dye: Shake the dye thoroughly. Use a wool dauber, sponge, or soft cloth to spread dye evenly in circular motions. Start with a light coat. Focus on edges for a finished look. Layer additional coats for deeper color, letting each dry completely.
- Dry and Layer: Allow the first coat to dry fully, which may take several hours or overnight. Apply extra coats for darker shades, letting each layer dry completely. Proper drying prevents streaks and uneven color.
- Apply a Finisher: Once the dye is dry, seal it with a leather finisher. Apply a thin layer with a clean cloth or sponge. The finisher protects the color and adds a subtle shine. Follow product instructions for best results.
- Let It Cure: Allow dyed patches to cure for at least 48 hours. This prevents smudging or color transfer. After curing, the leather is ready for use or attachment to garments.
FAQs
What dye is best for leather patches?
Aniline dyes penetrate deeply and keep leather soft. Pigment dyes provide vibrant color but a stiffer finish. Water-based dyes are safe and easier to clean.
Do I need to sand the leather?
Only if the surface feels rough. Light sanding ensures even dye absorption.
Can I layer colors?
Yes. Apply multiple light coats for depth. Let each coat dry before adding the next.
How long does dye last?
With proper finishing and curing, dyed patches maintain color for years. Avoid prolonged sun exposure and extreme moisture.
Summary
Dyeing leather patches takes preparation, patience, and proper finishing. Protect your workspace, clean the leather, apply dye in layers, and seal it for lasting color.
For those who want top-quality, custom patches without the DIY hassle, The Eagle Patches delivers durable, vibrant leather patches crafted to your exact style. Get professional results instantly and skip the trial-and-error.