Iron-on patches are supposed to be the easy win. So when yours starts doing that slow corner curl, it feels like your jacket is rejecting your entire personality. Relax. Most patches don’t “fail.” They get applied with the wrong heat, the wrong pressure, or the wrong laundry routine. Fix those, and your patch stops trying to escape.
How To Prevent Iron-On Patches From Falling Off
Know Why Patches Peel in the First Place
Iron-on adhesive is basically glue that needs three things to behave: a clean fabric surface, enough heat to melt, and enough pressure to push it into the fibers. When one of those is missing, the bond is weak and the edges lift first.
The other big culprit is movement. Hoodies stretch, backpacks flex, work shirts get washed a lot. If the item lives a rough life, you need a stronger bond or a little reinforcement.
Prep the Clothing Like You Mean It
If the clothing is brand new, wash and dry it before you apply the custom patch. New items can have finishes on them that block adhesive. Skip fabric softener on that wash. Softener can leave a coating that makes the patch glue less sticky.
Then lay the clothing on a hard, flat surface. Not a bed. Not a couch. You want a surface that lets you press down hard without the fabric sinking. Smooth the area and run the iron over it for a few seconds to remove wrinkles and moisture. Dry and flat is the goal.
Get the Heat Settings Right Without Cooking the Fabric
Turn steam off. Always. Steam adds moisture and can stop the adhesive from bonding properly.
Set the iron to the highest heat the fabric can handle. Cotton and denim are usually safe on higher settings. Polyester blends need lower heat and shorter presses. If you are unsure, test a hidden spot first.
Place the patch exactly where you want it, then cover it with a thin cotton cloth or parchment paper. That barrier protects the embroidery and helps spread heat evenly.
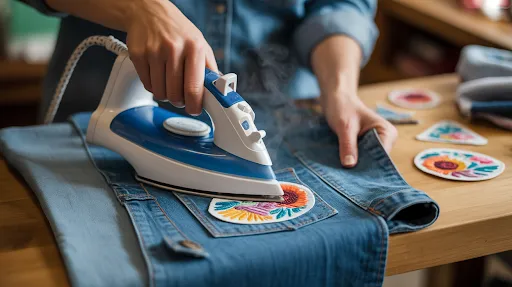
Press Like a Stamp, Not Like You Are Ironing a Shirt
This is where people mess up. Don’t slide the iron around. Press straight down with firm pressure. Hold for about 20 to 30 seconds, then lift and move to the next section. If the patch is larger, you press in sections until every part has had solid heat time. Give the edges extra attention. Corners are the first to lift because they get the least pressure.
If the clothing allows it, flip it inside out and press the back side of the patch area for another 10 to 15 seconds. That extra press helps the adhesive sink into the fabric. Then let it cool completely. Don’t tug at it while it’s warm. Cooling is when the bond locks in.
If you want a more detailed pressing walkthrough that applies to different items, this “How to Iron on Patches for Vibrant and Long-Lasting Style” guide is a good companion read.
Wash Habits That Keep the Bond Strong
Give the patch a full day before washing. Twenty-four hours is a safe rule.
When you wash, turn the garment inside out. Use cold or warm water. Avoid blasting it with high-heat drying every time. Heat can weaken adhesive over repeated cycles. If the item gets washed weekly, like uniforms or workwear, edge reinforcement becomes a smart move.
Match the Patch Type to the Job
Iron-on backing is convenient, but it’s not the best choice for every use case. If you’re applying an embroidered patch to a work jacket, a backpack, or anything that sees daily friction, add a few simple stitches around the edge or at least tack the corners.
If you need tiny text or fine detail, woven patches often read cleaner. For outdoor gear that gets beat up, PVC patches are tough. For premium branding, leather patches look great but stay simpler in design. Chenille is bold and varsity-style. Applique and sequin patches lean more fashion-forward. Sublimated patches work well for full-color artwork.
The point is simple. The more the item moves and the more it gets washed, the more you should think beyond adhesive alone.
FAQs
Why do iron-on patches fall off after a few washes?
Most of the time it’s low pressure during pressing, steam being used, washing too soon, or high-heat drying over and over.
Can you keep an iron-on patch on a hoodie?
Yes, but hoodies stretch and flex. Press thoroughly, focus on edges, and consider tacking the corners with a few stitches.
Do iron-on patches work on polyester?
They can, but polyester needs lower heat and shorter press rounds. Always test heat on a hidden area to avoid shine marks.
Should you sew iron-on patches too?
If the item is heavy-use or frequently washed, yes. Stitching the edge is the best way to make the patch stay long-term.
Get Your Iron-On Patches Stick Properly!
If you want iron-on patches that stay put, it comes down to basics: clean fabric, no steam, firm pressure, solid edge time, and a calm 24-hour wait before laundry. If you’re tired of guessing, The Eagle Patches USA can make your patches with the right backing for how you actually wear them, and with finishes that hold up on real-world gear.