If you have ever admired a detailed, sewn-on patch on a jean jacket or a well-designed logo on a tactical bag, you may have wondered how these things were made. There is something inherently interesting about how wearable art is made.
Looking for guidance to create a brand, outfit a company, or just express yourself with a unique piece of clothing with a custom patch? The first step you should take is understanding how to design a custom patch.
Turning an idea into a physical product means going through a creative process, utilizing specialized design software and using industrial machines. The guide below covers all of it.
Sourcing Inspiration and Designing Your Masterpiece
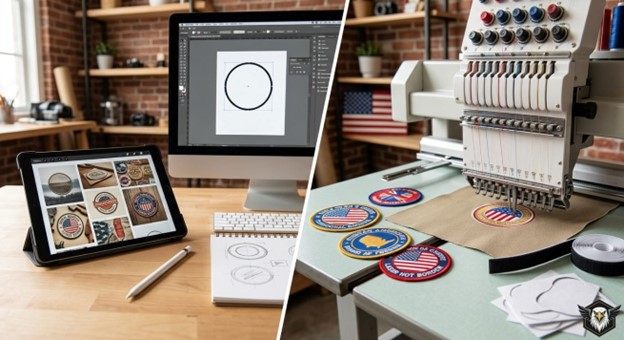
Starting any project means shaping ideas long before machines hum to life. To land a look, sketch some thoughts by hand first. Inspiration often grows from browsing platforms like Pinterest, where visuals stack into rough collages.
Images appear beside color swatches, old fonts pulled from forgotten styles. The screen fills slowly, piece by piece. AI can also help you design custom patches according to your prompts, even if you are not a designer.
Starting with a blank page might slow progress, yet generated visuals through artificial intelligence often spark unusual directions worth pursuing. When themes begin taking shape, digital execution becomes the next step.
Professionals tend to rely on software like Adobe Illustrator or sometimes Photoshop tools suited for crisp vector artwork ready for print or stitch, avoiding pixelation issues along the way.
When making products, such tools help set exact colors and sharpen outlines needed during fabrication. For those without design training, a patch maker online might be worth exploring. Such platforms typically let users move elements by dragging them, which simplifies arranging visuals before sending off for printing.
Exploring the Types of Custom Patches
Some designs work poorly with certain fabrics, meaning material choice matters. Embroidered patches bring a familiar texture, built from heavy thread. These stand as go-to options for uniforms, alongside older styles of wear.
Fine details often demand precision. Woven patches deliver clarity through thin, delicate threads perfect for intricate designs or cramped lettering. When toughness matters more than subtlety, PVC versions stand up better under harsh weather and heavy field use. Their rubber-based build handles rough handling without cracking or fading. Longevity shifts priority from texture to resilience when gear faces constant strain.
Chenille patches could be worth exploring. Its soft texture works well for fuzzy letterman-inspired patches. Sometimes, top-grain leather turns out better suited, especially when crafting premium hats or carryalls.
When searching for personalized custom patches USA-based experience tends to matter most. A trusted custom patch maker often guides choices by matching materials to both design details and spending limits.
Selecting the Perfect Backing Application
The way that you attach your patch is just as important as how it actually looks. The most traditional method of backings for attachment is to sew on a patch with a simple sew-on backing, which leaves you with a bare, flexible back.
For a quicker method of application, you can use an iron-on backing, which has a layer of heat-activated adhesive attached to it, so that once you place it on fabric, it will bond immediately by applying heat (from a standard iron or commercial heat press).
If you need a way to easily change out morale badges on tactical vests or uniforms, the standard method for that is using a hook-and-loop fastening (Velcro).
Patching can also be done as a temporary application using a peel-and-stick adhesive (a heavy-duty sticker) for your event or trade show. All of these different applications have some common uses.
PVC patches stand out when it comes to outdoor or tactical gear, thanks to their resilience against harsh conditions. Their ability to withstand moisture means performance stays consistent even in heavy rain.
Because they resist wear so well, these patches endure constant exposure without fading or cracking. Toughness becomes a key advantage where reliability matters most. Apart from that, you need to consider your budget, and calculate the total expense as some backings can increase the patch cost.
The Machinery Behind the Magic
In order to convert your digitally provided file into a physical patch, you will need specialized equipment and hardware. Before creating the actual patch, you must select the optimal size and digitize your vector art file using software that converts the image into a stitch map for the file that can be interpreted by a patch maker machine. After this process is complete, you can load the file into an industrial patch stitcher.
An industrial stitcher is a large, multi-headed embroidery machine that will sew several patches simultaneously using robotic arms that can stitch thousands of stitches per minute into a single, continuous piece of twill fabric.
When using PVC styles, the method of sewing patches will differ completely. Metal molds are used instead of needles to create the patches by injecting liquid polyvinyl chloride into the mold and baking it until cured.
Perfecting the Edges with Merrowed Borders
Your design’s edge serves to keep fabric from fraying while adding a clean, finished look, making the selection of the right border type for your patch important. The most traditional and also the most commonly used finishing technique is creating a merrowed border.
To create a merrowed border, an industrial sewing machine will wrap heavy overlock stitching around the entire outer edge of the design. The result of this technique is a thick, raised, durable rim.
Usually seen on balanced layouts, merrowed trims fit neatly around classic forms like circles, shields, and rectangles. When shapes twist unpredictably or follow unique outlines, hot-cut edging steps in. Instead of stitching, heat-driven tools trace the pattern sharply, slicing clean lines while gently fusing fabric ends to stop threads from loosening.
| Border Types | Description |
| Merrowed | A thick sewn edge stops fraying. |
| Hot Cut/Laser Cut | A hot knife cuts and seals this flat border. |
| Satin Stitch | A thick satin stitch is used for a clean and durable finish. |
| No Border/Die Cut | Used for PVC. The border is cut, but there is no need for a stitch. |
FAQs
What custom patch type is best for my company logo?
You can opt between woven and PVC patches, as they provide high details for logos and also are very durable.
What is the best backing for custom patches?
Sew-on backings are the best and strongest backings for custom patches. Iron-ons are easy and quick to apply comparatively.
Where is the best placement for a custom patch on my sports jersey?
The best placements for a custom patch on your sports jersey can be on the shoulders, on the left side of your chest, or backwards. These are the high-visibility areas.
How to make custom patch designs for people who are amateur designers?
For new designers, we advise using Pinterest and AI for design inspirations. Another way is to seek our expert teams’ free help to generate your custom patch design in accordance with your demands.
Partnering with a Reliable Manufacturer for Your Custom Patch Design
Many new business owners and creators are looking for custom patches but may not be able to afford to order thousands at once. If you would like to test a small amount of your designs, then you should find a trusted custom patch maker USA who offers custom patches no minimum order requirements. They offer these options while also maintaining the craftsmanship of highest quality and good communication.
You may want to find a vendor with similar qualities for the best custom made patches in USA. Being aware of the entire production process gives you more power to make a smart decision. The Eagle Patches USA is one such custom patch maker trusted by thousands of Americans and providing the best quality of patches for years now.
By becoming proficient in the design program, finding the appropriate materials for your patches, and knowing about the finishing options that are available, you can use your creativity and collaboration with the right patch maker to turn your idea into a fantastic piece of wearable custom patch.