Felt is the cheat code of patch making. It doesn’t fray, it holds shape, and it forgives tiny stitch mistakes that other fabrics love to expose. If you want a clean, durable look without fighting loose threads, this is the easiest way to level up your DIY game. Here’s how to embroider a patch on felt the fast, no-drama way, the kind of method we’d actually recommend in a DIY guide.
How to Embroider a Patch On Felt
What Felt Works Best for Embroidered Patches
Go with craft felt for practice, but if you want a sharper finish, use wool or wool-blend felt. It’s denser, smoother, and your embroidery stitches sit on top with a more professional look. Either way, felt is great because the edges won’t unravel, so our patch stays neat without extra fuss.
What We Need Before We Start
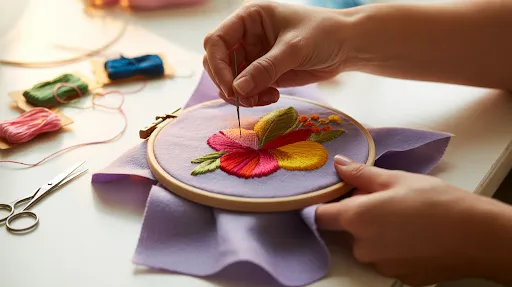
Keep it simple: felt sheet, embroidery floss, needle, scissors, and a way to transfer your design (pencil, washable marker, or tracing). If we’re making multiple patches, an embroidery hoop helps, but for small custom patches on felt, you can also stitch without one.
Step 1: Put the Design on the Felt
Trace the patch design directly onto the felt. Keep lines light and clean. If the design is detailed, simplify it slightly so the embroidery reads clearly from a distance. That is the secret sauce for any embroidered patch: bold shapes win.
Step 2: Cut the Felt Bigger than the Final Patch
Don’t cut the exact shape yet. Cut a rough square or circle around the design first. This gives us room to hold, stitch, and rotate without bending the final edges. We’ll trim it perfectly at the end.
Step 3: Choose the Right Stitches for the Job
We don’t need a whole stitch encyclopedia. For most felt patch embroidery, these cover almost everything:
- Backstitch for outlines and lettering
- Satin stitch for filled areas that should look solid and smooth
- French knots for tiny dots, texture, or eyes if you’re doing a character patch
Pick one outline stitch and one fill stitch and you’re basically unstoppable.
Step 4: Start Stitching from the Center Outward
If your design has a centerpiece (logo mark, icon, mascot face, anything), stitch that first. Then move to surrounding sections. This keeps the felt from shifting and helps spacing stay consistent. Keep your thread tension firm but not tight. Felt is tough, but it’s not trying to get strangled.
Step 5: Fill Cleanly and keep Direction Consistent
When we fill areas with satin stitch, keep the stitches running in the same direction. That’s what creates that polished “store-bought patch” look. If a filled area is big, split it into smaller sections so the stitches don’t snag or sag over time.
Step 6: Lock the Thread Like You Mean It
On the back, secure your thread with a small knot or weave it under a few existing stitches. Felt hides mistakes well, but loose thread ends love to betray us later. A clean back also matters if we’re adding backing or ironing it onto clothing.
Step 7: Trim the Patch to Final Shape
Now we cut the final shape. Use sharp scissors and take your time. If you want a classic embroidered patch look, leave a small margin around the design. If you want it modern, trim closer for a tight silhouette.
Optional Upgrades for a Tougher, Longer-lasting Patch
Add a Backing Layer for Strength
If the patch is going on a jacket, backpack, or uniform, add a second piece of felt behind it. Stitch the edges together with a simple whip stitch. This makes the patch thicker, more durable, and less likely to curl.
Add an Iron-on Layer for Easy Application
If you want that peel-and-press convenience, apply iron-on adhesive backing after stitching. It’s a solid option for attaching felt patches to clothing, but for heavy-use items, sewing the patch on is still the most reliable finish.
Clean Edge Finish for a Pro Look
Use a tight blanket stitch or whip stitch around the edge. This frames the patch, strengthens the border, and instantly makes it look more like a production-grade embroidered patch instead of a craft project.
FAQs
Is felt good for embroidered patches?
Yes. Felt is one of the best fabrics for embroidery patches because it’s stable, easy to stitch, and it doesn’t fray, so the edges stay clean.
Do we need an embroidery hoop to embroider a patch on felt?
Not always. Felt is stiff enough that small designs can be stitched without a hoop, but a hoop helps keep stitches even and neat.
What’s the best way to attach a felt patch to clothing?
For long-term durability, sew it on. Iron-on backing works well for light-to-medium wear, but stitching is the safest bet for jackets, bags, and workwear.
How do we keep the patch from looking messy?
Use fewer colors, thicker outlines, and consistent stitch direction. Most “messy” patches are just too detailed for the size.
Final Take!
Now you know how to embroider a patch on felt the fast, clean way: trace, stitch smart, trim sharp, and finish strong. If we want a DIY patch that looks handmade in a good way, felt is our best friend.
If you’d rather skip the trial-and-error and get professional custom embroidered patches made for your brand, team, or merch line, The Eagle Patches USA can handle the production side while you take the credit.